 |
 |
 |
 |
 |
 |
 |
 |
 |
 |
 |
 |
 |
 |
 Lots of folks have war stories about
upgrading fuel systems, and I'm one of them. Hopefully, you can learn
something from what I and others have been through, but there seems to be a
certain "art" in designing a fuel system that doesn't let anyone
get it right the first time around. So, like others, I've had a series
of upgrades to make the system work better. I'll outline these so you can
follow along the timeline.
Lots of folks have war stories about
upgrading fuel systems, and I'm one of them. Hopefully, you can learn
something from what I and others have been through, but there seems to be a
certain "art" in designing a fuel system that doesn't let anyone
get it right the first time around. So, like others, I've had a series
of upgrades to make the system work better. I'll outline these so you can
follow along the timeline.
Of course I started out with a stock fuel system, which was perfectly adequate for the power up to the LPE 383 motor, generating 450 crank horsepower. I wouldn't recommend that anyone with a 4th generation f-body spend any time upgrading their fuel system if the engine is normally aspirated, and 450 horsepower or less. Beyond that, things start to get interesting...
First upgrade
My first decision to upgrade came when I added a wet nitrous system, and expected to generate around 650hp at the crank. I was worried that the stock pump couldn't handle the volume. The fuel lines themselves may have been adequate (folks don't often replace them, even with 600-650hp cars), but I decided to change the fuel lines around as well. I wanted to use an external (to the tank) pump, so I'd be able to get at it if necessary, and to use two fuel filters, one on either side of the pump. I decided on the Paxton Kamikaze 750 external pump, and a second Peterson filter in front of the pump. At this point, I'm mostly racing the car. I also installed new 24lb Bosch injectors at this time (since upgraded to 30lb).
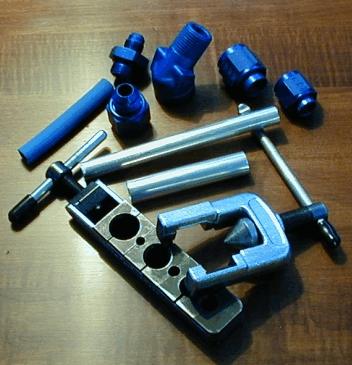 Before
you get started, you might as well familiarize yourself with the tools of
the trade. Namely flare fittings and aluminum line. You'll need to buy or
borrow a flaring tool, which you can use to flare your stock hard lines (say
you want to connect a braided line to them), or flare new aluminum lines.
You may be able to borrow the tool from a local speed shop, the one you get
all the fittings from. Once you've got this part figured out, it's just like
piecing together a sprinkler system. Now on to the hard stuff...
Before
you get started, you might as well familiarize yourself with the tools of
the trade. Namely flare fittings and aluminum line. You'll need to buy or
borrow a flaring tool, which you can use to flare your stock hard lines (say
you want to connect a braided line to them), or flare new aluminum lines.
You may be able to borrow the tool from a local speed shop, the one you get
all the fittings from. Once you've got this part figured out, it's just like
piecing together a sprinkler system. Now on to the hard stuff...
I upgraded the fuel system to ensure I didn't get any starvation
at high rpm's on nitrous. In essence, this is a two-phase project. You've got the part from the rear
seat (where the stock filter is) back to the tank, and the part from the same point
forward to the engine. I chose to do the rear half first, and see if that worked out.
Up front, I just replaced some of the lines with braided lines (for the cool
factor), and added an adjustable fuel pressure regulator as my pressure went
up quite a bit with this new pump.
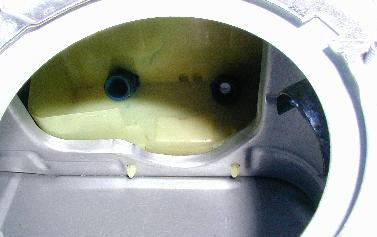 This picture is a bit hard to see, but
it's the new fuel connections inside the tank. There's a plastic baffle in the tank, which
holds a small amount of gas right by the stock pickup point, so that if you're low on
fuel, or making a long turn, you won't be as likely to run the pump dry. I put the new
feed and return lines at the bottom of the tank, and punched them through this plastic
box.
This picture is a bit hard to see, but
it's the new fuel connections inside the tank. There's a plastic baffle in the tank, which
holds a small amount of gas right by the stock pickup point, so that if you're low on
fuel, or making a long turn, you won't be as likely to run the pump dry. I put the new
feed and return lines at the bottom of the tank, and punched them through this plastic
box.
I used 5/8" line for the fuel feed, from the tank to the pump, but downstream of the last filter I'm still using the stock 3/8" lines up to the front. If these prove to be too small, I can just work on the front half of the car next. Same thing for the return - I used 1/2" hard line from about the same place under the back seat, into the tank. If you're replacing fuel lines, use either hard line (aluminum) or Teflon braided line (like brake line). Standard rubber braided lines will slowly leak fuel, and you'll have a slight fuel smell around the car and in your garage. Nothing you notice inside the car or anything, just when you get your nose close to the pump.
 |
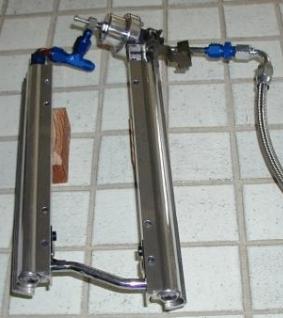 |
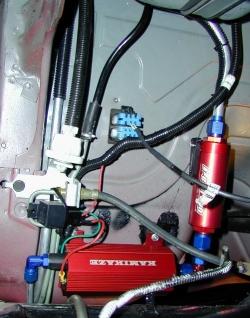
I installed the Kamikaze fuel pump and Peterson filter with shutoff valve to make sure I had lots of fuel pressure. They're bolted to the back of the driver's side rear seat. There's also a Russel filter downstream of the pump. The fuel feed and return lines loop over the axle by the inner wheel well seam. The pump is really loud, which is unfortunate. I can hear it all the time from inside the car, unless I have the stereo on.
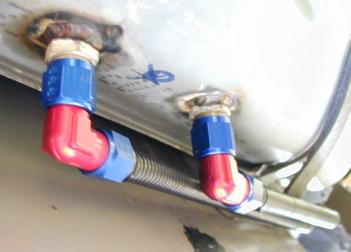
Up front, I changed the system a bit, too, but not dramatically. At the right is my fuel rail. You can see I feed the line into the stock-type regulator, via a braided line (I replaced all three of the plastic fuel lines with braided). The line's the same size as stock, 6AN. Then the return line is connected directly to the fuel rail via a threaded pipe fitting, and is also 6AN now (stock is 5AN). So this doesn't allow any more volume of fuel to the rails, it basically is for the looks of replacing those plastic lines. I do have the adjustable regulator on there, because the Kamikaze pump was raising up the pressure for some reason.
Tip
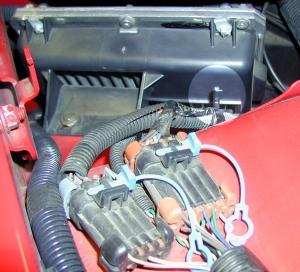 You
may end up needing to empty your fuel tank a few times during the process of
making a fuel system. Here's a trick, if you still have a functioning pump.
In the picture at the left, I've highlighted a short wire which extends out
from the large wire loom right in front of your PCM. If you connect this
wire directly to your +12V battery post, it will run the pump. You can use
this to pump out the tank (say, if you disconnect the line at the filter),
or just to pressurize the system to check for leaks without actually firing
the engine. Remember that most pumps don't like to be run dry, so if you're
emptying the tank, get this disconnected quickly as soon as possible.
You
may end up needing to empty your fuel tank a few times during the process of
making a fuel system. Here's a trick, if you still have a functioning pump.
In the picture at the left, I've highlighted a short wire which extends out
from the large wire loom right in front of your PCM. If you connect this
wire directly to your +12V battery post, it will run the pump. You can use
this to pump out the tank (say, if you disconnect the line at the filter),
or just to pressurize the system to check for leaks without actually firing
the engine. Remember that most pumps don't like to be run dry, so if you're
emptying the tank, get this disconnected quickly as soon as possible.
Conclusions
This fuel setup works very nicely for drag racing. Even with a pretty low tank, I don't run it dry. As you can see, though, there's more to come...
Second Upgrade
As I started to run faster around the road course, I found my pump was cutting out, sucking air, on hard braking and turns. It got worse as I got faster. Clearly, I had a problem, and the worst part was that it occurred while I still had over half a tank of gas in the car. Of course it was clear that the pickup was being exposed to air, but this was pretty bad, having 3-4 seconds of dead time on hard braking or turns. I looked into fuel cells (~$2,000 for one that fits in the stock location) and this just didn't seem like it should be necessary at my power level.
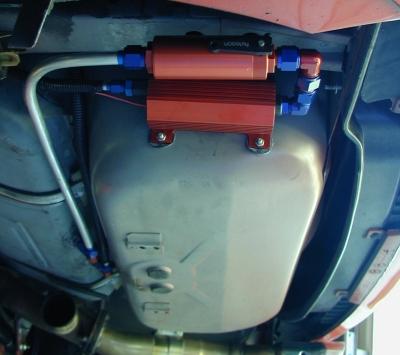 |
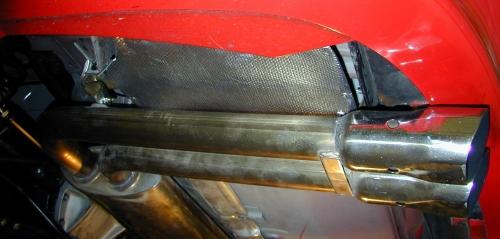
After staring at my setup for a bit, I decided that the pump was not in a good place. Most external pumps expect gravity to feed the fuel to their inlet - they don't "suck" fuel in, they only "push" it from the outlet. While my pump position was about level with the bottom of the tank, the feed line actually looped up to go over the axle, and was quite possibly nullifying the value of having the pump down low. I figured maybe once some air got into this line, it stuck in there for quite some time, even when fuel was back over the pickup, while the pump fought to pull that air through the whole fuel loop and back through the return into the tank. So here's the new system, with the pump and filter moved back to sit just above the left exhaust tailpipe. You can see the line extends horizontally from the tank, into the filter, through to the pump, which then pushes the fuel over the axle to connect where it used to, up where the filter is under the rear seat. Since I positioned the pump and the filter right above the exhaust, I figured it would be a good idea to shield them. So I made this shield from a sheet of aluminum, then attached some fabric heat shield to the aluminum. |
 |
Conclusions
This setup is working a little better than the first attempt, but still is far from perfect. It looks like a dual pump setup, or some sort of sump is the best way to go for the track.
References
Derek Martin has a good write-up on his beautiful fuel setup and Jeff Stevens also has a very nice write-up that you might want to check out as well.
|
Copyright © 1997-2004 David Mills, no part of this site (http://www.go-fast.org/) may be reproduced without permission of the author. The author makes no claims or guarantees as to the quality of the information on this site. I'm an enthusiast just like you, and while everything here is correct as I know it, I'm not responsible if your car breaks. |