 |
 |
 |
 |
 |
 |
 |
 |
 |
 |
 |
 |
 |
 |
![]()
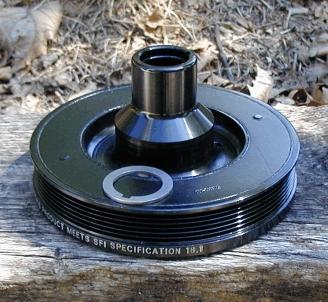
When Vibratech finally came out with their Fluidampr harmonic damper for LT1 motors, I decided to get one. They're supposed to be especially useful on stroker motors, that have more chance for vibration with their longer stroke.
The
other damper on the market is the ATI Super Damper. I chose Fluidamper
because it shows better damping characteristics below 7,000 rpm, whereas
the ATI damper is better above 7K, but I never rev that high.
The Process, Generally...
Assuming you've still got the stock
damper on the car, or maybe an aftermarket underdrive pulley, here's the
deal. This damper replaces everything on the front of the crank. So you'll
be pulling off your stock damper and/or pulley, as well as the
three-legged hub that's on the crank. Then you'll need to get a Woodruff
key that fits in the slot in the crank and damper, insert the key into the
crank, and press the Fluidampr back on to the crank. The stock crank is
keyed, but the stock hub is simply press-fit on to the crank, so you won't
have a key in there as you remove the hub. You'll need a hub puller and
installer (you can usually borrow or rent these from a local auto parts
shop), as well as the correct Woodruff key (a good hardware store will
have a stock, much cheaper than those at the auto parts shop), a
replacement crank bolt (7/16-20-2 1/2" from auto parts shop, which includes a large heavy
washer), a 7/16-20-3" grade 8 bolt
(long version of the crank bolt), anti-seize, and standard hand tools.
Disassembly
Put the car up on nice solid ramps, leaving it in gear to keep the engine from turning over as you pull bolts off the crank.
Remove the serpentine belt by putting a 13mm wrench on
the tensioner pulley, swinging it down, and pulling off the belt. Remove
the stock damper, which is held on with three bolts. This should just come
off with a little tugging, but if it doesn't come off, it can be pulled
off with the puller you've rented or borrowed.
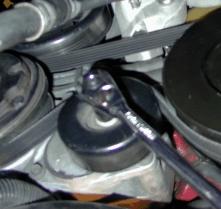
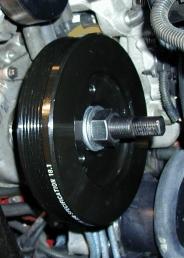
You'll remove the crank hub next. First, remove the crank bolt with a 5/8" socket, then thread it back in about halfway. Install the puller as shown in the picture above, making sure the center bolt will align straight into the crank. Tighten the center bolt and draw the hub out. Once the hub hits the bolt head, you'll need to remove the puller and the crank bolt, and replace it with the longer 3" bolt you bought, to finish the process. Use anti-seize on the crank bolts as you use them.
Don't go any farther yet. Mark, in some permanent way, the spot on the stock crank hub where the key slot in the crank aligns to it. If you ever need to reinstall the stock hub, you'll need it aligned the same way it was when you pulled it off.
You're done with the removal process!
If, for some odd reason, you find that you need to replace the crank seal
during this process, here's how.
Reluctor Gear Spacer
If you've got an OBD-I (1995 or earlier) car, you'll need to slip the spacer supplied over the crank. Verify that you don't have electronics coming in to the crank timing sensor (at about the 7 o'clock position on the timing cover) and slide on the ring. If your car is newer, and has these electronics, you don't need this spacer ring.
The Key
 Okay,
here's a tricky bit. These are Woodruff
keys, which go in the slot in the crank and the hub, and keep the hub from
spinning. The stock hub was a "press fit" and used no key, but
the Fluidampr is installed with a key. You'll probably need to find the
right sized key, unfortunately. I've got an aftermarket Lunati crank,
which apparently doesn't use a standard Chevy Small Block key size.
Okay,
here's a tricky bit. These are Woodruff
keys, which go in the slot in the crank and the hub, and keep the hub from
spinning. The stock hub was a "press fit" and used no key, but
the Fluidampr is installed with a key. You'll probably need to find the
right sized key, unfortunately. I've got an aftermarket Lunati crank,
which apparently doesn't use a standard Chevy Small Block key size.
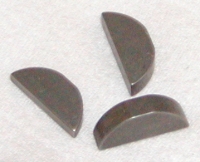
 The
standard SBC key is 3/4" long,
5/16" tall and 3/16" thick. This key was way too tall for my
setup. I purchased a mixed set of keys, and found that one 5/8" long, 7/32" tall and 3/16"
thick was close, but still too tall for my setup. I had to have this key
machined down to the final measurements of
5/8" long, 3/16" tall, and 3/16" thick, the final size that
worked for my setup. That key is shown at the right. This might be the same for you, but as I say, your
crank may have a different keyway cut in it. The keyway in the Fluidamper
is 3/16" wide and 0.10" deep, if that helps you any.
The
standard SBC key is 3/4" long,
5/16" tall and 3/16" thick. This key was way too tall for my
setup. I purchased a mixed set of keys, and found that one 5/8" long, 7/32" tall and 3/16"
thick was close, but still too tall for my setup. I had to have this key
machined down to the final measurements of
5/8" long, 3/16" tall, and 3/16" thick, the final size that
worked for my setup. That key is shown at the right. This might be the same for you, but as I say, your
crank may have a different keyway cut in it. The keyway in the Fluidamper
is 3/16" wide and 0.10" deep, if that helps you any.
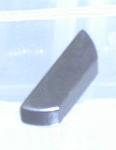
 To
install the key, first verify that it slides smoothly along the damper
slot. You'll be pressing it into the crank, then pushing the damper over
it, so you don't want it to hang up on the damper as it goes in (believe
me, you DON'T want that to happen). Use a small file to clear any burrs
off the damper keyway if necessary. Then, using a large set of pliers, a
rag to keep your crank from getting dinged, and your fine file, get the
key fitted into the crank, rounded end in. You want this to be a very
tight fit, but will likely need to do just a bit of filing on the key,
rounding the edge that goes into the crank, etc. Make sure you're not
damaging the key slot in the crank, since the key is pretty hard metal.
The final result should look like the picture at the left, with the key
tilting slightly downward to help it slide under the damper hub as it
slides on.
To
install the key, first verify that it slides smoothly along the damper
slot. You'll be pressing it into the crank, then pushing the damper over
it, so you don't want it to hang up on the damper as it goes in (believe
me, you DON'T want that to happen). Use a small file to clear any burrs
off the damper keyway if necessary. Then, using a large set of pliers, a
rag to keep your crank from getting dinged, and your fine file, get the
key fitted into the crank, rounded end in. You want this to be a very
tight fit, but will likely need to do just a bit of filing on the key,
rounding the edge that goes into the crank, etc. Make sure you're not
damaging the key slot in the crank, since the key is pretty hard metal.
The final result should look like the picture at the left, with the key
tilting slightly downward to help it slide under the damper hub as it
slides on.
If you have too much
trouble getting the key in, you might want to remove the crank seal (the
rubber & metal seal around the crank that's sort of greenish-gray) to
give yourself more clearance. A new one is about $10, and easy to install
once the key is in.
Pulling on the Damper
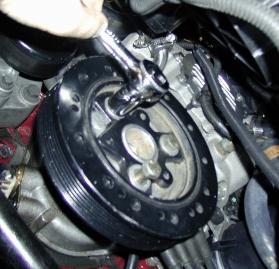
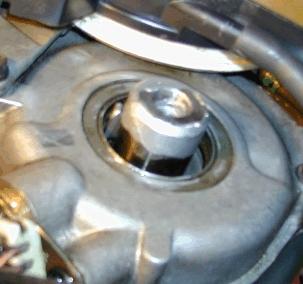
First, grab a pen and mark a spot on the outside of the hub where the keyway is cut, so you can align the hub with the key as you put it on. Also, mark a line at the depth that the stock hub was installed into the face of the timing cover, so you'll know about when you're going to be done. You can see these marks on the damper in the picture above, as well as the key I've got in the crank. Smear anti-seize around the inside of the damper, and on the end of the crank. Assemble the installation tool, and while you hold the damper in the right position, thread the installation tool through it, into the crank bolt hole. You won't be able to push the hub on at all by hand, so you need to hold the hub in place by threading in the tool by hand tightly enough.
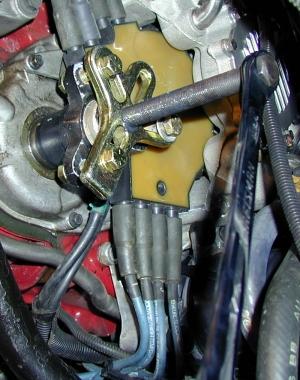
 A
note on the tool is in order. This tool will be used to crank the damper on
to the end of the crank. It'll take quite a bit of force to get it on there
- I wouldn't be surprised if it's around 100 ft-lbs of force. Since the
tool is in two pieces, you DO NOT want to crank the tool such that it
bottoms out into the crank bolt hole. If you do this, it's likely that the
tool will disassemble itself as you remove it, leaving you with only one
option for getting the rest of the tool out - pulling the damper off. So
tighten the tool together well, and when installing it, back it out about a
turn from the bottom of the crank bolt hole. Then hold it tight when
cranking the damper on, so that it doesn't turn back into the crank.
A
note on the tool is in order. This tool will be used to crank the damper on
to the end of the crank. It'll take quite a bit of force to get it on there
- I wouldn't be surprised if it's around 100 ft-lbs of force. Since the
tool is in two pieces, you DO NOT want to crank the tool such that it
bottoms out into the crank bolt hole. If you do this, it's likely that the
tool will disassemble itself as you remove it, leaving you with only one
option for getting the rest of the tool out - pulling the damper off. So
tighten the tool together well, and when installing it, back it out about a
turn from the bottom of the crank bolt hole. Then hold it tight when
cranking the damper on, so that it doesn't turn back into the crank.
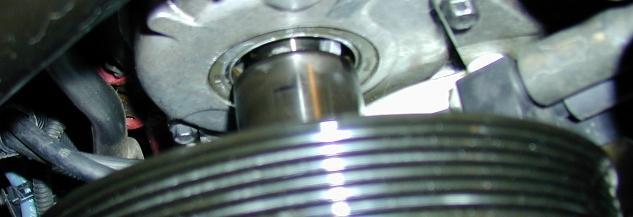
Okay, go ahead, crank the damper on. Try as well as you can to verify that the key is actually sliding into the slot in the crank, and stop immediately if it's not. It won't magically correct itself if it starts going the wrong way - you'll need to start over if this happens. Watch the depth against the line you drew, and stop once the force tightens up.
Back
out the tool, and breathe a sigh of relief. Install the replacement crank
bolt, and torque it down to 70 ft-lbs. Replace the serpentine belt (this is
a stock-sized 7¼" diameter pulley, so your stock belt will fit), and
you're done.
Conclusions
As you may have noticed, you need the right tools for this job. You can't pound this thing on with a hammer, so just make sure you have the right tools. Getting the right key is critical as well, so take your time here. This install was a first for me, and I must say it was rather frustrating. The folks at Vibratech were nice enough, but it seems I may have been the first person to install one - including them. They didn't know the key sizes necessary, which was one of the tougher issues I had.
It's been a bit tough deciding whether anything was accomplished with the damper. I originally installed it because I thought the engine might run a bit smoother, and also I figure it's good for the longevity of the motor. It does feel smoother at upper RPM's, but frankly I can't tell if I might just be imagining this. Either way, it's stayed on, and seems to be working well enough.
|
Copyright © 1997-2004 David Mills, no part of this site (http://www.go-fast.org/) may be reproduced without permission of the author. The author makes no claims or guarantees as to the quality of the information on this site. I'm an enthusiast just like you, and while everything here is correct as I know it, I'm not responsible if your car breaks. |